
How Reta works: three signals at once
Most weight-loss shots flip one or two switches. Retatrutide flips three at the same time — which is why it's called a triple agonist.
GLP-1 — the appetite signal.
Slower stomach emptying, steadier fullness, less food noise.
GIP — the insulin helper.
Helps the body release insulin when glucose is on board (its action is glucose-dependent) and supports nutrient handling. Some people find the GLP-1/GIP combination easier to tolerate than older single-pathway drugs — that's a common impression, not a promise of nausea protection.
Glucagon — the furnace.
Signals the liver to burn stored fat and nudges energy expenditure up. This is the signal that separates Reta from the older shots.
DIAGRAM
Three signals at once

Two realities that come with it
Reality 1 — hunger can drop to zero, and that's the trap.
When appetite disappears, it's easy to slide from three meals a day to a few hundred calories and call it progress. It isn't. Fast weight loss can include real lean-tissue loss along with the fat — and "lean mass" isn't only muscle: water, glycogen, and other tissue count in that number too, so not every pound of it is muscle. The muscle piece is the one you can defend, and defending it is what the protein, lifting, and tracking habits in this guide are for. Lose the muscle along with the fat and you get a lighter scale, a softer body, and a metabolism that fights you later.
Reality 2 — your pulse can come up a few beats.
In the phase 2 trial, resting heart rate rose with dose, peaked around 24 weeks, and then declined — so a bump here is a described effect to track, not a surprise. Your number is yours to follow; a trial average doesn't predict your response. It is not automatically dangerous, and it is not automatically harmless either. The signs that turn it into a medical question are in the pulse answer below and again in "When to get help."
Mixing and syringe math
The vial, the water, and the U-100 syringe in plain language — with the worked example this guide was built around.
The numbers on this page are a worked example, not a universal standard. They assume a 10 mg vial of retatrutide with exactly 1.0 mL of bacteriostatic water added, which this example treats as a final volume of 1.0 mL — about 10 mg per mL. (That "final" is part of the assumption: the dissolved powder can add a little volume of its own.) Vials, labels, and prescriptions vary. Adding water doesn't verify what was in the vial. Before you draw anything, confirm the vial, the water volume, and the math with your prescriber or pharmacist.
Why "units" confuse people
U-100 means 100 units = 1.0 mL. The marks on the barrel measure volume — how much liquid — not how much drug. How much retatrutide sits in each unit depends entirely on how much water you added to the vial. Change the water, change the math. That's why every number below carries its assumption.
The worked example: 10 mg vial, 1.0 mL water added
In this example, one unit on the syringe = 0.1 mg of retatrutide.
| Dose | Volume | U-100 units | On the syringe |
|---|---|---|---|
| 0.25 mg | Volume0.025 mL | U-100 units2.5 units | On the syringeThe 2.5-unit marking, if present — never estimate |
| 0.50 mg | Volume0.05 mL | U-100 units5 units | On the syringeThe 5 mark |
| 0.75 mg | Volume0.075 mL | U-100 units7.5 units | On the syringeThe 7.5-unit marking, if present — never estimate |
| 1.00 mg | Volume0.1 mL | U-100 units10 units | On the syringeThe 10 mark |

The part people skip
Plenty of U-100 syringes only mark every unit or every two units — there is no 2.5 or 7.5 line. If your dose lands between marks, don't eyeball it, and don't change your dose or your schedule to make the math easier. That's a call to your prescriber or pharmacist, not a workaround.
Mixing rules — three, in order
- Aim at the glass wall. Angle the needle so the water runs down the inside of the vial instead of blasting the powder.
- Control the vacuum. Hold the plunger with your thumb so the vial's vacuum doesn't snap the water in.
- Swirl like wine. Swirl gently until it's fully dissolved. Never shake.
After mixing: Refrigerate right away — 36 to 46°F (2 to 8°C). Ask your pharmacist how long it stays good once mixed. One needle per poke, into a sharps container.
The needle truth
31-gauge, 5/16-inch insulin needles are hair-thin. If a poke stings, a wet alcohol swab is one common reason — technique, the site, and a sensitive day can do it too. Swab, let the skin air-dry, then inject, and move the site around from poke to poke.
An example split schedule
One worked schedule — the briefing's twice-a-week pattern — with weekly totals and per-dose amounts kept separate.
Why anyone splits the week
A single weekly injection tends to peak hard in the first day or two — nausea, fatigue, reflux — and bottom out around day 6 to 7, when hunger comes back with interest. The theory behind splitting: take the same weekly amount as two smaller shots about 3.5 days apart, and those swings should even out. That's a rationale, not a proven guarantee for everyone — tracking how you actually feel is how you find out what your week does. Splitting also means more shots, more math, and more chances to get it wrong, which is why it's a plan to build with your prescriber, not a hack to copy from a stranger's post.
The example
DIAGRAM
The month ladder

Cadence: Monday morning and Thursday evening — or any two days 3.5 to 4 days apart.
| Step | Weekly total | Per dose | Worked-example syringe line (10 mg/mL) |
|---|---|---|---|
| Month 1 · weeks 1–4 | Weekly total0.5 mg/week | Per dose0.25 mg twice weekly | Worked-example syringe line (10 mg/mL)2.5 units per injection |
| Month 2 · weeks 5–8 | Weekly total1.0 mg/week | Per dose0.50 mg twice weekly | Worked-example syringe line (10 mg/mL)5 units per injection |
| Month 3 · weeks 9–12 | Weekly total1.5 mg/week | Per dose0.75 mg twice weekly | Worked-example syringe line (10 mg/mL)7.5 units per injection |
| Month 4 · weeks 13–16 | Weekly total2.0 mg/week | Per dose1.00 mg twice weekly | Worked-example syringe line (10 mg/mL)10 units per injection |
The months are spaced a month apart in this example — not a timer that runs itself. Dose changes are your prescriber's call. The example's own rule is worth keeping: if you're losing 1 to 2 pounds a week with no side effects, stay put. The lowest effective dose is the goal; it's the one your muscle and your wallet both prefer.
Two timing ideas that don't mix
The source material behind this guide describes two different weeks, and they are not interchangeable:
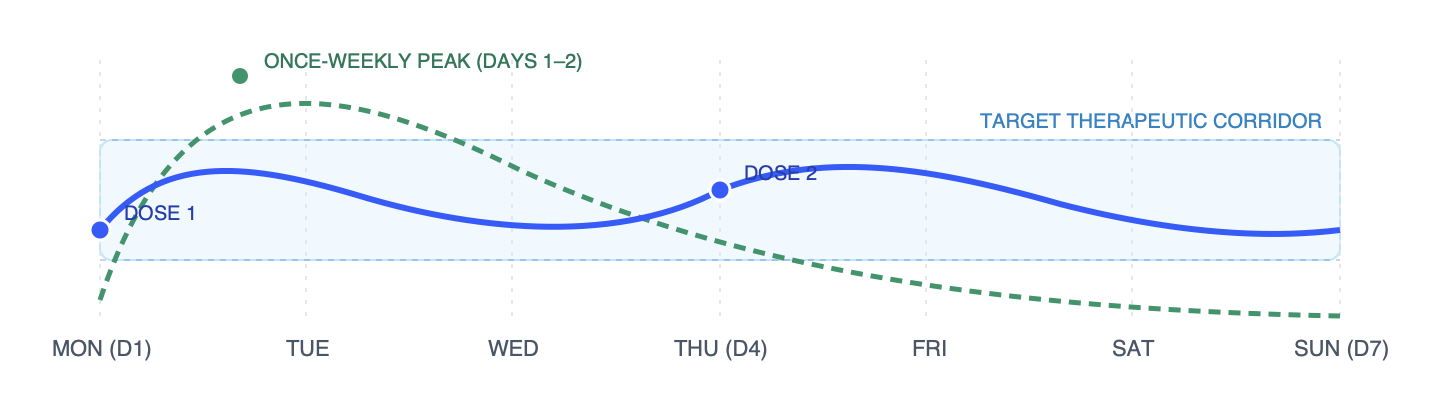
The split week — the one above.
Two administrations about 3.5 days apart, intended to reduce the swings; response varies. This is the schedule the example builds.
The source's illustrative once-weekly wave.
Heaviest appetite suppression in the first 1 to 3 days after a shot; appetite returning on days 5 to 7. This describes a single weekly injection — and it's the pattern splitting is meant to even out.
Don't stack them into one calendar — and don't treat either pattern as a guarantee. If you're on a once-weekly shot, the briefing's tactic is to plan whole-food meals and the hardest training for the days you feel most like eating, and lean on liquid protein during the heaviest suppression. If you're on the split, the aim is for that wave to even out — track your own curve rather than assuming it away.
Six rules that protect your muscle
Lose weight with Reta and keep the tissue that moves it — the briefing's six rules, with the why attached.
Rule 1 — Get your protein liquid when solid food turns you off.
When delayed stomach emptying makes dry chicken or steak feel impossible, switch to cold, clear protein. Whey isolate or ultra-filtered milk are the gram-for-gram options; chilled bone broth can be easier on the stomach, but its protein content varies and it isn't an equal substitute. Sip about 30 grams over 45 minutes instead of chugging. Cold and liquid first; solids come back when they come back.
Why: chewing aversion is dose-related, not a character flaw — and the protein floor still counts on the days you don't want to eat.

Rule 2 — Lift heavy three days a week.
The briefing's lifting template: three non-consecutive days, 35 to 45 minutes, built around four compounds: leg press, chest press, lat pulldown, Romanian deadlift — two heavy working sets each, stopping 1 to 2 reps short of failure. Scale the loads and the movements to your own baseline and any injuries. High-rep, sweat-on-the-floor circuits spend the recovery this plan needs, so the plan buys the lifting first.
Why: a small dose of heavy work signals your body that the muscle is still in use — adapted to where you're starting, not someone else's numbers.
Rule 3 — Track your strength floor.
Write your working weights down. If a compound lift drops more than 5 percent across two workouts in a row, treat it as a review trigger, not a verdict: fatigue, hydration, sleep, and technique all move strength, so it isn't proof of muscle loss. What it does mean: pause the next dose increase, bring it up with your prescriber, and review nutrition and recovery — with more protein as the first lever. Consistency across weeks is what tells the story.
Rule 4 — Five grams of creatine, every day.
Rapid loss and low intake leave muscles looking and feeling flat. Five grams of plain creatine monohydrate daily is a simple, well-studied way to support muscle water and training output while you're in a deficit. Measure 5 g — scoop sizes vary, so check the label. Any time, every day.
Illustrative once-weekly pattern
Rule 5 — Ride the wave, if you have one.
This rule belongs to the source's illustrative once-weekly pattern, not a guarantee of your week: days 1 to 3 are when appetite runs lowest, so liquid protein earns its keep; days 5 to 7 are when the plan places whole-food meals and your hardest sessions. On the split schedule, the aim is for the wave to even out — see the schedule section.
Rule 6 — Protect sleep, or nothing else works.
Some people run a higher overnight pulse on these medicines. The briefing's evening routine: no caffeine after noon — that line is a source example, not a universal law — and 300 mg of magnesium bisglycinate before bed. That dose is also an example: magnesium labels list the elemental amount, and the right plan for you is a clinician conversation, especially if you're also using magnesium for the bowel rule above — don't stack the two by default. If sleep stays broken, that's a clinical conversation, not a supplement problem.
Daily habits that keep the engine steady
Three small routines the briefing treats as non-optional — morning, digestion, and what's on the plate.
Morning
Habit 1 — Water first; salt if it fits you.
The briefing's morning routine: 16 to 20 ounces of water and about ½ teaspoon of sea salt — or an electrolyte mix — before your coffee. These medicines shift how the body handles sodium and water, and mornings are when the bill can come due: lightheadedness, headaches, flat fatigue. But that salt line is a source example, not a rule for everyone — extra sodium is the wrong move with high blood pressure, kidney disease, heart conditions, or any fluid restriction. Ask your prescriber what your morning glass should look like.
Digestion
Habit 2 — Have a bowel plan before you need one.
Slowed stomach emptying slows everything downstream. Constipation sits behind a big share of the nausea and sulfur burps people blame on the drug. The briefing's routine: two kiwis or three prunes on most days, and if 36 hours pass with no bowel movement, its example step is 400 mg of magnesium citrate — never letting a gap reach 48 hours. Those hours are the briefing's rule, not a medical deadline; your normal is your own baseline and can be different from the next person's. The 400 mg figure doesn't say which form it means, and magnesium labels list the elemental amount — your kidneys are how your body clears it, and extra magnesium can build up when kidney function is reduced. Build the plan — including any laxative — with your clinician or pharmacist first. Severe belly pain, or vomiting alongside the constipation, is not a wait-and-see.
On the plate
Habit 3 — Cold beats hot when nausea is high.
When digestion is slow, the smell of hot food can trip the gag reflex before the first bite. Cold and cool foods go down easier: Greek yogurt, cottage cheese, cold deli turkey roll-ups, chilled smoothies. Save the hot dinners for the days you actually want them.
Three fears, answered straight
Q1
Is the heart-rate bump dangerous?
Not usually — and not automatically, either. In the phase 2 trial, resting heart rate rose with dose, peaked around 24 weeks, and declined from there — so a bump is a described effect of this drug, not a mystery, and people vary. Track it instead of diagnosing it: same time, same conditions, written down. Get it checked if the rise is large, keeps climbing, lasts all day, or shows up with palpitations, chest pain, breathlessness, dizziness, or fainting. And if you have a heart condition, tell your prescriber about any change.
Q2
Am I going to get "Ozempic face"?
What people mean by that is facial hollowing and loose skin after fast weight loss. Facial hollowing usually reflects fat loss itself — the face has thin fat pads that shrink when total fat drops — and skin can lag behind fast changes. Lean-tissue loss can contribute too. Two levers help: keep the pace moderate (the example targets about 1 to 1.5 pounds a week) and hold the protein and lifting rules, so more of the loss comes from fat. That combination stacks the odds in your favor; it can't promise how your face and skin will respond — age, genetics, and total fat loss are in that room too. If the change is coming fast, have the pace conversation with your prescriber.
Q3
Can I just skip eating on the days I'm not hungry?
No. Skipping food on zero-hunger days is how people accidentally land far below the protein and calories they need — and that's when lean-tissue loss speeds up. (Your body can make glucose from amino acids when intake is very low; that pathway draws on body protein, though it isn't automatic and it isn't the whole story.) The protein floor is the deal you keep even when hunger is gone. If nausea is what's blocking the floor, that's the signal to go liquid for a few days and talk to your prescriber — not to fast through it.
When to get help
Three zones. Read the red one now, even if you feel fine.
GREEN — common adaptation.
Expected, keep going, keep notes.
- Mild redness at the injection site.
- A small resting-pulse bump (see the pulse answer above).
- Short-lived morning nausea.
- Snack cravings gone.
Action: Continue as prescribed. Check in at your next visit. Green means nothing here surprises your care plan.
YELLOW — pause and adjust.
Slow down and make the call.
- Sulfur burps — the rotten-egg taste.
- No bowel movement for 36 to 48 hours.
- Fatigue lasting more than 3 days.
- Skipping meals for a full day.
Action: Pause the next dose increase and check in with your prescriber. The briefing's adjustments (source examples, not standard orders): its magnesium-citrate step, liquid protein, and electrolytes — with the bowel plan set by you, your clinician, or your pharmacist.
RED — stop and get medical care now.
- Severe, unyielding upper abdominal pain, especially pain that radiates to your back. Emergency care now — this is the pattern that can mean pancreatitis.
- Persistent vomiting, or not being able to keep fluids down at all. Urgent care now. Don't wait out a fixed number of hours — being unable to hold fluids is the thing to act on.
Action: Discontinue injections and get medical care.
When in doubt, call. Nothing on the green list excuses a symptom that scares you.
The two-page quick reference
Everything you actually use day to day — the worked syringe math, the example schedule, the muscle rules in short form, the three habits, and the traffic-light symptom panel — on two pages built to print and stick on the fridge.
- Download the PDF two pages, Letter
-
To print this page, use your browser's Print command (⌘P or Ctrl+P).
The full explanations stay on this page; the PDF points back here.
Keep reading
On this site:
- What is retatrutide? The bigger picture.
- Microdosing retatrutide: how the split-week conversation started.
- Protecting muscle on GLP-1s.
- Peptide safety and sourcing.
Current product status (external):
- Lilly — what to know about retatrutide (investigational; not currently FDA-approved).
- FDA — concerns about unapproved GLP-1 drugs used for weight loss.
- NEJM — retatrutide phase 2 trial (dose-dependent resting heart-rate changes).
- NIH Office of Dietary Supplements — magnesium (labels list elemental amounts; kidney cautions).